
Red5Pro Streaming SDK チュートリアル |
株式会社サムライズ |
改訂履歴
版数 |
日付 |
内容 |
改訂者 |
1.0 |
2019/01/08 |
吉田 |
3.2.1. Red5Pro HTML5 Streaming SDKの解凍
5.2.2. Red5Pro Android SDKライブラリのファイル移動
5.2.7. Top画面に対するActivityクラスの編集
5.2.8. Publish、Subscribeに関するFragmentクラス
5.2.10. Publishに関するFragmentクラス
5.2.11. Publishに対するListOfFragmentの編集
5.2.12. Publishに対するActivityクラスの編集
5.2.15. Subscribeに対するActivityクラスの編集
5.3. AndroidによるStreamingサンプルアプリケーション
本稿はInfrared5( http://www.infrared5.com/ )が提供する製品Red5Pro Streaming SDKの環境構築手順とチュートリアルを掲載したものです。Red5Proは、リアルタイム通信技術のソリューションとサービスを提供しており、本製品を通じてWebアプリケーション、iOS、Androidなどのモバイルアプリケーションに対応したライブビデオストリームを配信または視聴することが可能になります。
Streaming SDKを使用したライブストリーミングは次のプラットホーム上で行うことができます。
● ブラウザ
● iOS
● Android
通常のWebアプリケーションに視聴用のプレイヤーを提供するだけではなく、Android/iOS/HTML5/Flashを含むプラットフォーム間にて一貫的に接続するFacetimeのようなアプリケーションを構築することができます。
導入前に、必ず本セクションの「事前準備 」を予めご確認頂きますようお願い致します。
システムの概要についての関連リンク先を以下に示します。
関連リンク先
内容 |
URL |
概要 |
|
Streaming SDK |
本稿の用語の定義を以下に示します。
用語一覧
用語 |
詳細 |
SDK |
Red5Proが提供するストリーミングSDK。 |
Publisher |
ストリーミングの配信側。 |
Subscriber |
ストリーミングの視聴側。 |
QuickStart |
Red5Pro Streaming SDKを用いたアプリケーション作成チュートリアル。 |
サンプルアプリケーション |
Infrared5がGithubにて提供しているサンプルアプリケーション。 |
各プラットフォームの開発には、以下のSDKライブラリ、ストリーミングサーバモジュールの準備が必要となります。
● Red5Pro SDKモジュール
○ red5pro-sdk-html-x.x.x-release.zip
○ red5pro-sdk-android-x.x.x-release.zip
○ red5pro-sdk-ios-x.x.x-release.zip
● Red5Pro Serverモジュール
○ red5pro-server-xxx.zip
これらは弊社サムライズ担当よりご案内致します。製品ご購入後、受領されていない場合は以下のメールアドレスへご連絡下さい。
● ttakashima@samuraiz.co.jp (担当:高島)
本稿における推奨ブラウザは以下になります。
● Google Chorme 68.0.3440.106(Official Build)64 ビット
※ 2018/08 現在の最新バージョンです。
※ 以降「ブラウザ」と表記しているものは、上記を対象とします。
また本チュートリアルは、カメラを備えたハードウェアを前提に実施願います。
以下のハードウェアでの動作確認を行っています。
● macOS
○ MacBook Pro 13 2016 Late
○ MacBook Pro 13 2014 Mid
● Windows
○ ASUS ux305ca
○ Dell Inspiron 15
各プラットフォームのSDKを利用し、動画の配信、視聴するアプリケーションを開発するには、ストリーミングサーバであるRed5Pro Serverの構築が必要です。本セクションでは、開発用としてローカル環境にRed5Pro Serverを構築する手順 を解説します。
本セクションでは以下の技術知識を前提としています。
● Java
本セクションは、macOSによる操作を前提としています。
推奨するバージョンを以下とします。
● macOS
○ High Sierra 10.13.5以上
また利用するターミナルは以下を推奨します。本稿では標準ターミナルを前提に解説しています。
● 標準ターミナル
● iTerm
※ シェル環境は「bash」を前提に解説しています。zsh, fishなどをご利用の方は各環境に合わせて設定下さい。
ストリーミングサーバの起動には、Javaの実行環境をインストールする必要があります。
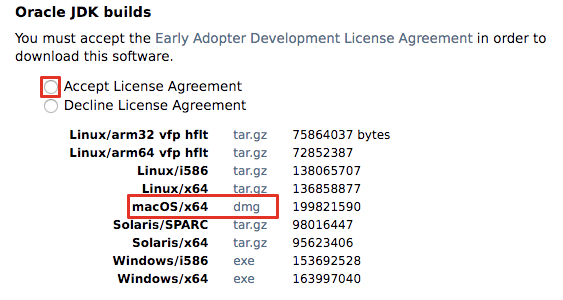
ブラウザにて、URL「 http://jdk.java.net/8/ 」にアクセスします。
以下の「Oracle JDK builds」にて、ライセンス条項の同意とmacOS/x64のリンク「dmg」をクリックします。SDKのダウンロードが開始します。
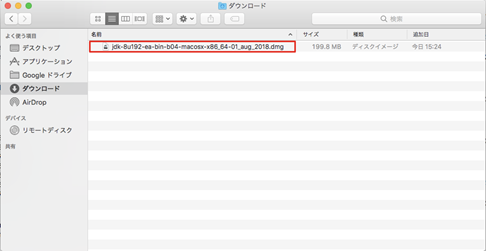
ダウンロードが完了したらFinderで「$HOME/Downloads」を開きます。
(ブラウザの設定に依存しますが、ダウンロード先は「$HOME/Downloads」とします)
「jdk-8u192-ea-bin-b04-macosx-x86_64-01_aug_2018.dmg」をダブルクリックします。
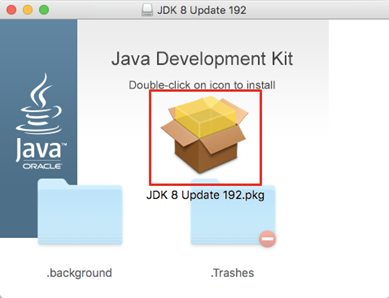
JDKのインストーラが起動します。
「JDK 8 Update 192.pkg」をダブルクリックします。
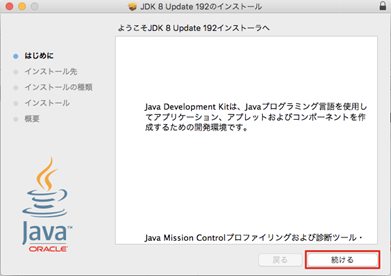
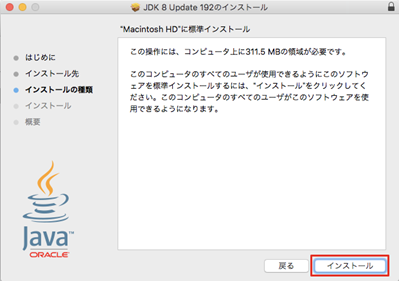
「続ける」をクリックします。
「インストール」をクリックします。JDKのインストールが開始します。
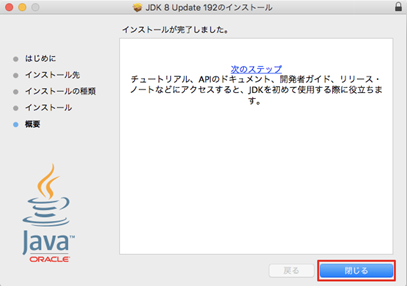
インストールが完了しました。「閉じる」をクリックしインストーラを終了します。
環境変数「JAVA_HOME」と「PATH」の設定を行います。
ターミナルを起動、設定ファイル「.bashrc($HOME/.bash_profile)」を開き、以下の内容を追記 して下さい。
. . . export JAVA_HOME=`/usr/libexec/java_home -v 1.8` export PATH=$JAVA_HOME/bin:$PATH |
ターミナルを終了します。
$ exit |
再度ターミナルを起動し、以下のコマンドを実行します。
以下のように表示されれば完了です。
$ java -version java version "1.8.0_192-ea" Java(TM) SE Runtime Environment (build 1.8.0_192-ea-b04) Java HotSpot(TM) 64-Bit Server VM (build 25.192-b04, mixed mode) |
本セクションは、開発用にmacOS上にストリーミングサーバの構築の手順を解説します。
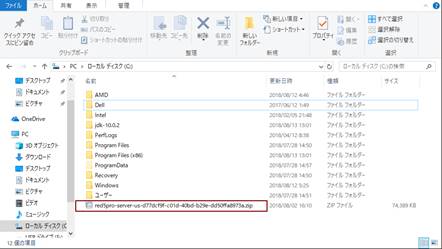
「1.1.1. 各種モジュールの取得」にて取得したRed5Pro Serverモジュールを利用します。
※ 「$HOME/Downloads」に「 red5pro-server-xxx.zip」がダウンロードされている事を前提とします。
ターミナルを開いて以下のコマンドを入力し、Red5Pro Serverの.zipファイルを解凍します。
$ cd Downloads/red5pro-server-xxx.zip |
次のように解凍された事を確認してください。
drwxr-xr-x@ 24 user staff x x 00:00
red5pro-server-5.1.1.b236-release |
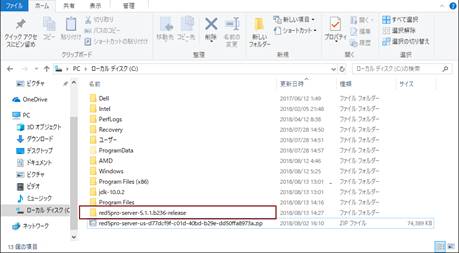
サーバを所定の場所に移動し、ディレクトリ名をリネームします。
以下のように出力されるかを確認して下さい。
$ mv red5pro-server-5.1.1.b236-release $HOME/red5pro |
Red5Pro Serverの起動、停止ファイルに実行権限を与えます。
以下のコマンドは、その対象のファイルを絞り込み、表示しています。
$ cd red5pro |
実行権限を追加します。以下のコマンドを実行します。
以下のように実行権限「x」が付与されたことを確認して下さい。
$ chmod +x *.sh |
次にサーバを起動します。以下のコマンドを入力して下さい。
$ ./red5.sh |
以上で、ストリーミングサーバの起動は完了です。
起動確認を行いますので「Red5Pro Serverの動作確認 」へ進んで下さい。
本セクションは、Windowsによる操作を前提としています。
推奨するバージョンを以下とします。
● Windows10 Home(Pro推奨)
また利用するターミナルは以下を推奨します。本稿では標準ターミナルを前提に解説しています。
● 標準コマンドプロンプト
※ 「cmd.exe」を前提に解説しています。powershellをご利用の方は、環境に合わせて設定下さい。
ストリーミングサーバの起動には、Javaの実行環境をインストールする必要があります。
ブラウザにて、URL「 http://jdk.java.net/8/ 」にアクセスします。
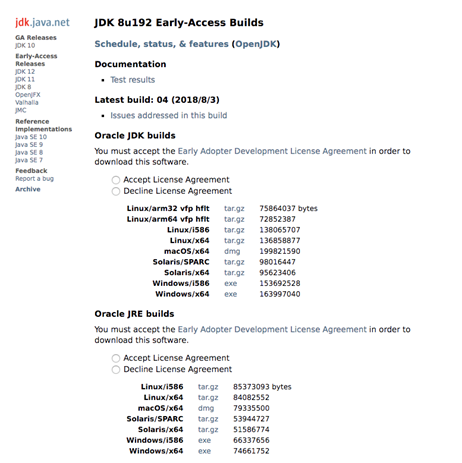
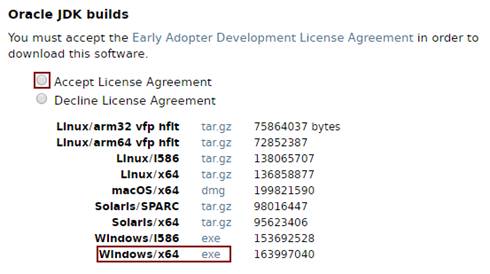
以下の「Oracle JDK builds」にて、ライセンス条項の同意とWindows/x64のリンク「exe」をクリックします。SDKのダウンロードが開始します。
ダウンロードが完了したらエクスプローラで「%USERPROFILE%\Downloads」を開きます。
(ブラウザの設定に依存しますが、ダウンロード先は「%USERPROFILE%¥Downloads」とします)
「jdk-8u192-ea-bin-b04-windows-x64-01_aug_2018.exe」をダブルクリックします。
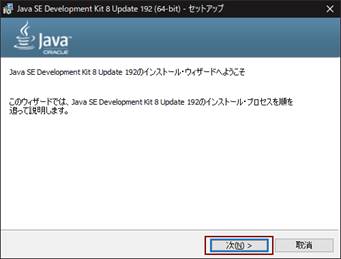
JDKのインストーラが起動します。

次へをクリックします。
変更をクリックします。
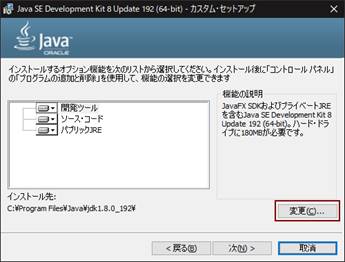
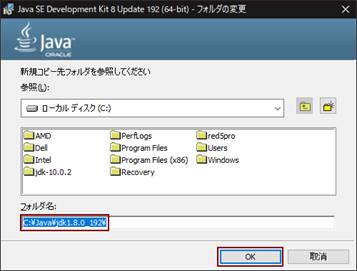
インストールディレクトリを「C:\Java\jdk1.8.0_192」にして「OK」をクリックします。
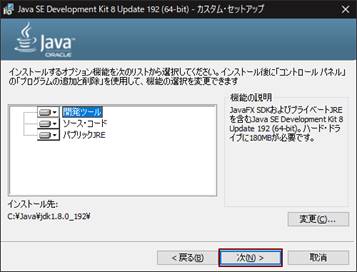
「次」をクリックします。JDKのインストールが開始します。
「OK」をクリックします。

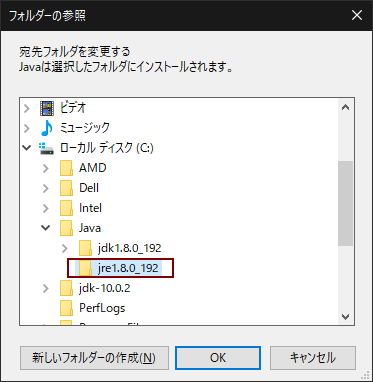
次にJREのインストールディレクトリを指定します。
「変更」をクリックします。
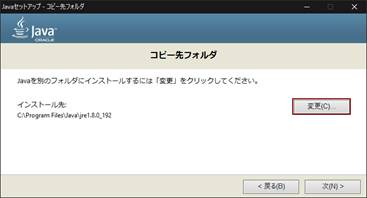
インストールディレクトリ「C:\Java\jre1.8.0_192」を作成し、選択後「OK」をクリックします。
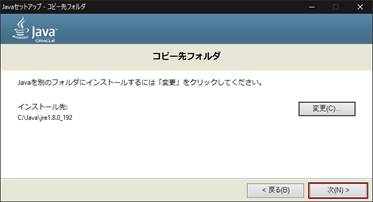
「次」をクリックします。JREのインストールが開始します。
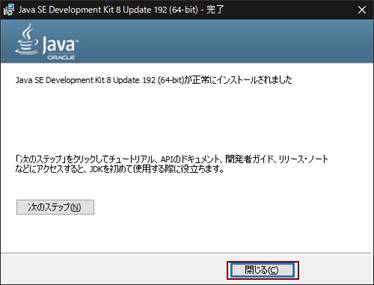
インストールが完了しました。「閉じる」をクリックしインストーラを終了します。
コマンドプロンプトを管理者権限で実行します。
以下のキャプチャに従って操作して起動して下さい。
※ 以降、コマンドプロンプトを管理者権限で起動する際は本手順を実施してください。

環境変数「JAVA_HOME」と「PATH」の設定を行います。
コマンドプロンプトに以下のコマンドを入力してください。
C:\WINDOWS\system32>cd C:\ |
コマンドプロンプトを終了します。
$ exit |
再度コマンドプロンプトを起動し、以下のコマンドを実行します。
以下のように表示されれば完了です。
C:\WINDOWS\system32>java -version |
本セクションではWindowsによるサーバの構築の手順を記します。
※本稿では「C:\」に「red5pro-server-xxx.zip 」がダウンロードされている事を前提とします。
Red5Pro Serverの.zipファイルを解凍し、フォルダが存在することを確認してください。
● red5pro-server-xxx-release
扱いやすさを考慮し、解凍したディレクトリ名をリネームします。
コマンドプロンプトを管理者権限で開き、以下のように出力されるかを確認して下さい。
C:\WINDOWS\system32>cd C:\ |
サーバを起動します。以下のコマンドを入力して下さい。
C:\>cd red5pro |
以上で、ストリーミングサーバの起動は完了です。
起動確認を行いますので「Red5Pro Serverの動作確認 」へ進んで下さい。
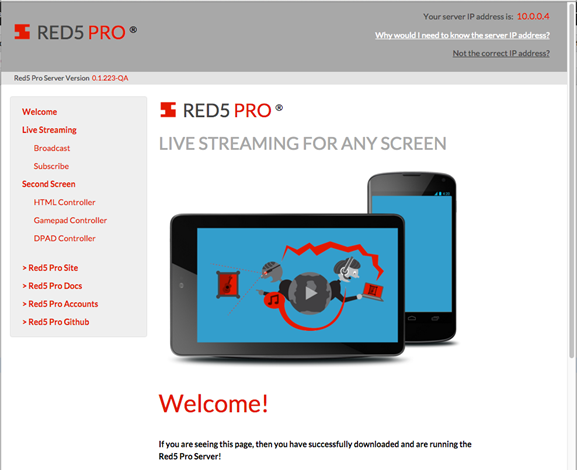
本セクションでは、Red5Pro Serverの動作確認を行います。ポート5080でサーバにアクセスして、Red5Pro
Serverが動作することを確認します。
ブラウザを開き、以下のURLにアクセスします。
http://localhost:5080 |
以下の画面が確認できればサーバの動作確認は完了です。
本セクションにおける前提条件を以下とします。
本セクションは、Windowsでの操作を前提としています。
● Windows 10 Home(Pro推奨)
また、本稿は開発者を対象者としており、以下の技術知識を前提とします。
● JavaScript
● HTML5
● Node.js
● Git
開発環境は、以下を推奨としています。
ご利用の作業環境を事前に整えて頂きますようお願い致します。
● Node.js
○ Node.js 5.0.0( https://nodejs.org/ja/download/releases/ )
● Git
○ Git for Windows( https://gitforwindows.org/)
本セクションでは、Webブラウザによるライブビデオストリームの配信および視聴方法について解説します。なお、本セクションで記載しているQuickStart、サンプルアプリケーションは「WebRTC」プロトコルで動作します。
HTML5 Steaming SDKを利用して、配信機能と視聴機能を備えたシンプルなアプリケーションの作成を行います。
「red5pro-sdk-html-x.x.x-release.zip」を解凍し、以下の階層でディレクトリが存在していることを確認してください。
red5pro-sdk-X.X.X-release.b5
└── lib
    ├── red5pro
    ├── screenfull
└── swfobject |
本セクションでは、配信用のページを作成します。
以下の階層に「publisher.html」を作成します。
red5pro-sdk-X.X.X-release.b5 ├── lib └── publisher.html |
「publisher.html」を次のように編集します。
publisher.html
1 |
<!doctype html> |
「publisher.html」について補足します。
<L4>
以下のタグで、マルチブラウザでストリーミングを配信、視聴するライブラリを読み込んでいます。
4 |
<script src="https://webrtc.github.io/adapter/adapter-latest.js"></script> |
<L7>
以下のタグで、後述の「publisher.js」の設定を読み込んでいます。「publisher.js」が当タグを認識できるようにid属性が付与されています。
7 |
<video id="red5pro-publisher" autoplay muted></video> |
<L8>
以下のタグでRed5Pro HTML5 Streaming SDKを読み込んでいます。
8 |
<script src="lib/red5pro/red5pro-sdk.min.js"></script> |
<L9>
以下のタグで後述する配信用のJavaScriptファイルを読み込んでいます。
9 |
<script src="publisher.js"></script> |
同様にして、以下の階層に「publisher.js」を作成します。
red5pro-sdk-X.X.X-release.b5 ├── lib ├── publisher.html └── publisher.js |
「publisher.js」を次のように編集します。
publisher.js
1 |
(function (red5prosdk) {

  window.red5prosdk.setLogLevel('debug');

  var publisher = new red5prosdk.RTCPublisher();

  publisher.init({
      protocol: 'ws',
      port: 8081,
      host: 'localhost',
      app: 'live',
      streamName: 'stream1',
      iceServers: [{urls: 'stun:stun2.l.google.com:19302'}],
      streamMode: 'live',
      mediaElementId: 'red5pro-publisher',
      bandwidth: {
        audio: 56,
        video: 512
      },
      mediaConstraints: {
        audio: true,
        video: {
          width: {
            exact: 640
          },
          height: {
            exact: 480
          },
          frameRate: {
            min: 8,
            max: 24
          }
        }
      }
    })
    .then(function() {
      return publisher.publish();
    })
    .catch(function(error) {
      console.error(error);
    });

})(window.red5prosdk);
|
「publisher.js」について補足します。
<L5>
配信処理を行うには、メソッド「RTCPublisher」を利用してインスタンスを生成します。
5 |
var publisher = new red5prosdk.RTCPublisher(); |
<L7-35>
コード中の次の部分で、配信や視聴を行うための設定について記述をしています。
8 |
protocol: 'ws', |
各プロパティの説明は以下の通りです。
設定 |
説明 |
protocol |
ストリーミングの送受信に用いるプロトコルの設定をしています。 |
port |
ストリーミングのポート番号を指定しています。 |
host |
接続するサーバのIPアドレスを指定しています。 |
app |
WebSocketがリスニングしているWebアプリケーションの名称です。 |
streamName |
ストリーミングのチャネル名を指定しています。 |
iceServers |
ストリーミングのためのICEサーバを指定しています。 |
streamMode |
配信の種類を指定しています。 本稿ではライブ配信である”live”を指定しています。 |
mediaElementId |
<video>タグを認識するためのidを指定しています。 本稿では「publisher.html」の<video>タグのid属性”red5pro-publisher”と同じである必要があります。 |
本セクションでは、ストリーム視聴用のページを作成します。
以下の階層に「subscriber.html」を作成します。
red5pro-sdk-X.X.X-release.b5 |
「subscriber.html」を次のように編集します。
subscriber.html
1 |
<!doctype html> |
<L5>
以下のタグで再生や停止などのレイアウトを担うCSSファイルを読み込んでいます。
5 |
<link href="lib/red5pro/red5pro-media.css" rel="stylesheet"> |
<L9-11>
以下のタグで読み込むビデオタグにidを割り当てています。
9 |
<video id="red5pro-subscriber" class="red5pro-media red5pro-media-background" |
<L13>
以下のタグでブラウザの画面全体で見るためのJavaScriptファイルを読み込んでいます。
13 |
<script src="lib/screenfull/screenfull.min.js"></script> |
<L14>
以下のタグで後述する配信用の設定を読み込んでいます。
14 |
<script src="subscriber.js"></script> |
同様にして、以下の階層に「subscriber.js」を作成します。
red5pro-sdk-X.X.X-release.b5 |
「subscriber.js」を次のように編集します。
subscriber.js
1 |
(function (red5prosdk) {

    window.red5prosdk.setLogLevel('debug');

    var subscriber = new red5prosdk.RTCSubscriber();

    subscriber.init({
      protocol: 'ws',
      port: 8081,
      host: 'localhost',
      app: 'live',
      streamName: 'stream1',
      iceServers: [{urls: 'stun:stun2.l.google.com:19302'}],
      bandwidth: {
        audio: 56,
        video: 512
      },
      mediaElementId: 'red5pro-subscriber',
      subscriptionId: 'mystream' + Math.floor(Math.random() * 0x10000).toString(16),
      videoEncoding: 'NONE',
      audioEncoding: 'NONE'
    })
    .then(function(subscriber) {
      return subscriber.subscribe();
    })
    .then(function(subscriber) {
    })
    .catch(function(error) {
      console.error(error)
    });

  })(window.red5prosdk);
|
「subscriber.js」について補足します。
<L5>
視聴処理を実装するには、メソッド「RTCSubscriber」を利用してインスタンスを生成します。
5 |
var publisher = new red5prosdk.RTCPublisher(); |
<L7-31>
コード中の次の部分で、視聴を行うための設定について記述をしています。
プロパティの内容については配信側と同じです。
8 |
protocol: 'ws', |
作成したQuickstartを実行します。「ストリーミングサーバの構築 」で構築したサーバが起動していることを確認し、作成した配信側、視聴側の画面をブラウザで別々に開き、配信側の映像が視聴側の画面で視聴可能であるかを確認してください。
以下のファイルをブラウザで開きます。
C:¥red5pro-sdk-X.X.X-release.b5¥lib¥publisher.html |
別途ブラウザでウィンドウを開き、以下のファイルを開きます。
C:¥red5pro-sdk-X.X.X-release.b5¥lib¥subscriber.html |
※ ブラウザは カメラとマイクの使用を許可する必要があります。
前セクション「HTML5によるQuick Start 」では、SDKを利用した最もシンプルなアプリケーションの作成方法を解説しました。本セクションでは、Infrared5社がGitHubに公開しているサンプルアプリケーションを紹介します。本サンプルアプリケーションは、プロダクト用途を想定したSDKの利用サンプルを提供しています。
サンプルアプリケーションを取得します。Gitを利用してプロジェクトをクローンします。
作業ディレクトリを「C:\」とします。
コマンドプロンプトを管理者権限で起動し、以下のコマンドを実行してください。
C:\WINDOWS\system32>cd C:\ |
実行後、以下のようにサンプルがクローンできたことを確認して下さい。
C:\>dir | findstr streaming-html5 |
本セクションでは、サンプルプロジェクト「streaming-html5」を起動方法を解説します。
「HTML5によるQuickStart 」と同じく、配信側、視聴側の画面をブラウザで別々に開き、配信側の映像を視聴側の画面で確認します。
事前に「ストリーミングサーバの構築 」で構築したサーバが起動していることを確認して下さい。
コマンドプロンプトを開いて以下のコマンドを実行します。
ライブラリのインストールと実行可能な構成をディレクトリに出力します。
C:\>cd ~/streaming-html5 |
Webサーバの起動を行ないます。以下のように出力されたら完了です。
C:\streaming-html5>npm run webserver |
ブラウザを開き、以下のURLにアクセスして下さい。
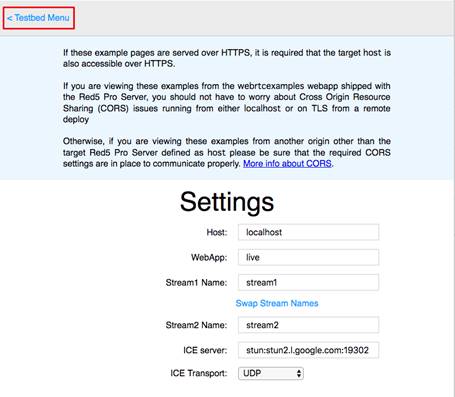
以下の設定画面が表示されたら、サンプルの起動完了です。
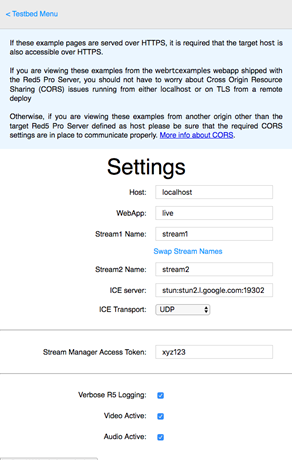
配信処理に利用するストリーミングサーバの接続設定を行ないます。
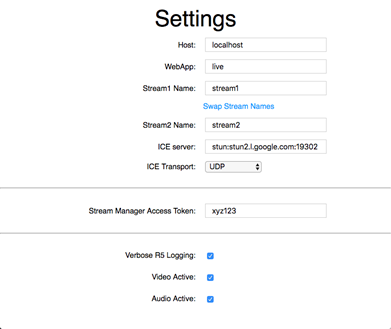
ローカル環境でストリーミングサーバを起動していることを前提としているため、これらの設定を変更する必要はありません。
設定 |
初期値 |
説明 |
Host |
localhost |
ストリーミングサーバの接続先です。開発を想定してローカルにサーバを構築しているため、localhostを指定しています。 |
WebApp |
live |
ストリーミングサーバのWebアプリケーションの名称です。変更する必要はありません。 |
Stream1 Name |
stream1 |
ストリーミングのチャネル名です。任意の文字列を指定が可能ですが、わかりやすいものを指定するべきです。 |
Stream2 Name |
stream2 |
同じくストリーミングのチャネル名です。 |
ICE server |
stun:stun2.l.google.com:19302 |
PtoP通信をNATを超えて実現するサーバを指定しています。初期値ではGoogleが提供しているSTUNサーバです。変更する必要はありません。 |
ICE Transport |
UDP |
ICEとの接続プロトコルです。変更する必要はありません。 |
Stream Manager Access Token |
xyz123 |
Stream Managerが提供するAPIのアクセストークンです。本稿では利用しません。変更する必要はありません。 |
Verbose R5 Logging |
true |
ログの出力を有効にします。 |
Video Active |
true |
ビデオを有効にします。 |
Audio Active |
true |
オーディオを有効にします。 |
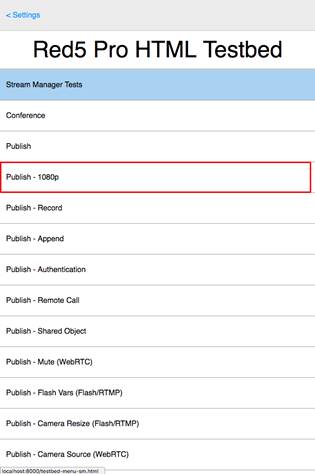
設定を確認後、以下のリンク「Testbed Menu」をクリックします。
アプリケーションが提供しているサンプルの一覧が表示されます。
本セクションでは「Publish - 1080p」を選択します。
(解像度「1080p」でのストリーミングを行うサンプルです)
以下のように配信画面が表示されます。配信画面の起動は以上です。
別途ブラウザのウィンドウを新たに起動し、再度以下のURLにアクセスして下さい。
接続設定は「配信画面」で設定した内容に合わせて下さい。
設定を確認後、以下のリンク「Testbed Menu」をクリックします。
アプリケーションが提供しているサンプルの一覧が表示されます。
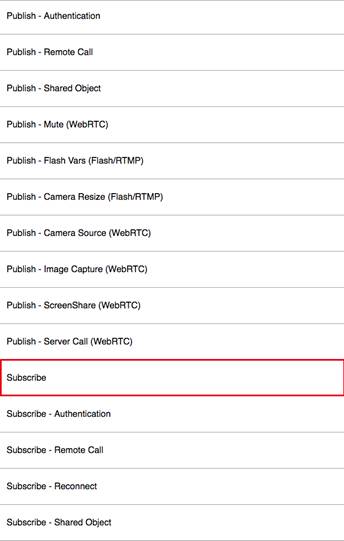
「Subscribe」を選択します。
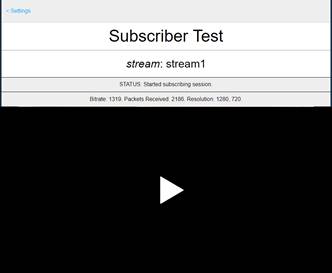
次のような画面に、配信側の映像が表示されたら完了です。
提供されているサンプル機能を紹介します。実装時の参考にご利用下さい。
<配信サンプル>
タイトル |
説明 |
Publish |
フェイルオーバーを伴うWebRTCを使用する基本的な配信のサンプルです。 |
Publish - 1080p |
高品質の配信サンプルです。 |
Authentication |
配信用の Simple Auth Plugin による認証の例を示します。 |
Camera Source |
配信する希望のカメラを選択する方法を示します。 |
Image Capture |
配信中のライブビデオの画像をキャプチャする方法を示します。 |
Mute |
配信中のオーディオのミュートと解除の方法を示します。 |
Record |
VOD(ビデオオンデマンド)のストリームをサーバーに録画する方法を示します。 |
Append |
VOD(ビデオ・オン・デマンド)のサーバーへのストリームのレコードを追加する機能を示します。 |
Remote Call |
すべての視聴側にリモートメッセージを送信する方法を示します。 |
Shared Object |
リモート共有オブジェクトを使用して、接続されたクライアント間で情報を送受信する方法を示します。 |
Stream Manager |
Red5 Pro Stream Manager APIを使用して、オートスケーリングクラスタのオリジンに配信する方法を示します。 |
Stream Manager Proxy |
Red5 Pro Stream ManagerをSSL WebSocket Proxyとして利用し、オートスケーリングクラスタのオリジンにWebRTCを配信する方法を示します。 |
Stream Manager Provision Form |
Adaptive Bit Rate(ABR)ブロードキャストのStream Managerに新しいプロビジョニングを送信するための簡単なフォームを提供します。 プロビジョニングが送信されたら、お気に入りのメディアエンコーダを使用してバリアントをブロードキャストします。 |
Stream Manager Proxy Transcoder |
Stream ManagerにAdaptive Bit Rate(ABR)ブロードキャスト用の新しいプロビジョニングを送信し、トランスコーダを使用して単一のバリアントブロードキャストを開始するための簡単なフォームを提供します。 |
Two-Way |
視聴中に同時に配信することで、会話が可能になります。 ストリーム検出と自動接続が含まれます。 |
Screen Share |
ChromeとFirefoxの画面共有機能を活用したサンプルです。 |
<視聴サンプル>
タイトル |
説明 |
Subscriber |
フェールオーバーを使用した基本的な視聴のサンプルです。 |
Audio Only |
オーディオのみのストリームの再生方法を示します。 |
Authentication |
視聴用の Simple Auth Plugin による認証の例を示します。 |
Image Capture |
ライブビデオの画像をキャプチャする方法を示します。 |
Cluster |
Red5 Pro Cluster APIからアクセスしてライブで視聴する方法を示します。 |
Reconnect |
Red5 Pro HTML SDKのフェイルオーバーメカニズムをデモンストレーションし、ブラウザのサポートに基づいてサブスクライバを選択し、ブロードキャストまたは接続の切断時に自動再接続するようにしました。 |
Remote Call |
ブロードキャスタ(配信側)からリモートメッセージを受信する方法を示します。 |
Shared Object |
リモート共有オブジェクトを使用して、接続されたクライアント間で情報を送受信する方法を示します。 |
Screen Share |
ChromeとFirefoxの画面共有機能を活用したサンプルです。 |
Stream Manager |
ライブストリームを視聴するためにエッジサーバーにアクセスし、Red5 Pro Stream Manager APIを使用して、SSL WebSocket Proxyとして機能することを例として示します。 |
Stream Manager Proxy |
Red5 Pro Stream Manager APIを使用して、エッジサーバーにアクセスしてライブストリームを視聴する方法を示します。 |
Stream Manager Proxy Transcoder (RTC) |
Red5 Pro Stream Manager APIを使用して、プロビジョニングおよびエッジサーバーにアクセスし、Adaptive Bitrate Controlを使用してライブのWebRTCストリームを視聴する方法を示します。 |
Stream Manager Proxy Transcoder (RTMP) |
Red5 Pro Stream Manager APIを使用して、プロビジョニングおよびエッジサーバーにアクセスし、Adaptive Bitrate Controlを使用してライブのFlashストリームを視聴する方法を示します。 |
Stream Manager Proxy Transcoder (HLS) |
Red5 Pro Stream Manager APIを使用して、プロビジョニングおよびエッジサーバーにアクセスし、Adaptive Bitrate Controlを使用してライブのHLSストリームを視聴する方法を示します。 |
本セクションでは、iOSデバイスによるライブビデオストリームの配信および視聴方法について解説します。なお、本セクションで記載しているQuickStart、サンプルアプリケーションは「RTSP」プロトコルで動作します。
本セクションにおける前提条件を以下とします。
開発として使用可能なAppleIDを所持していること。
(実機テストにあたってApple Developer Programに加入する必要はありません)
● iOSシミュレータでの動作については保証しておりません。なお、本稿における実機テストは以下の端末を用いて行っています。
本セクションにおける前提条件を以下とします。
macOSでの操作を前提としています。
● macOS(High Sierra 10.13.5以上)
Xcodeがインストールされている必要があります。バージョンは以下です。
● Xcode 9.4.1
iOSシミュレータでの動作については保証しておりません。
なお、実機での動作検証は、以下の端末を用いて行っています。
● iPhone8 Plus(iOS 11.4)
以下の技術知識を前提としています。
● iOS
● Swift 4
● Objective-C
● Git
本セクションでは、配信機能と視聴機能を備えたシンプルなアプリケーションを作成するQuickStartを行います。トップ画面にて「Publish」または「Subscribe」を選択すると、それぞれライブ配信とその視聴を行うことが出来ます。
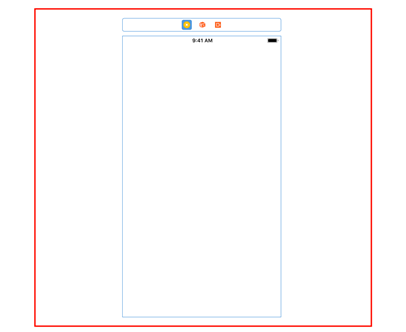
Quickstartの完成画面は以下のように表示されます。
<Publish>
<Subscribe>
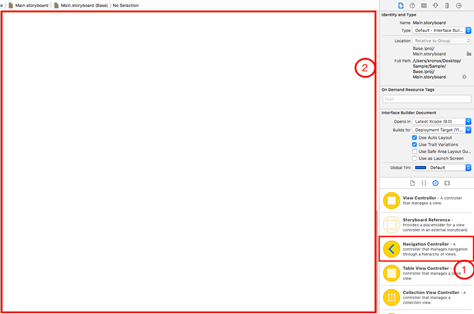
Xcodeを起動し、「Single View App」プロジェクトを任意のディレクトリにて作成します。
「red5pro-sdk-ios-x.x.x-release.zip」を解凍後、以下のファイルが存在していることを確認してください。
● R5Streaming.framework
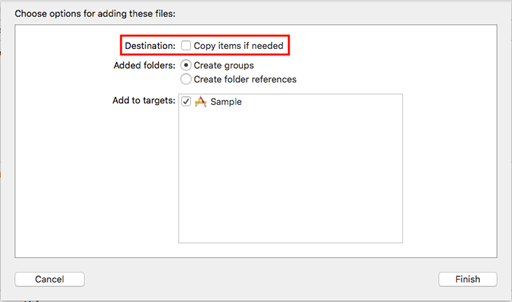
「R5Streaming.framework」を赤枠の部分へドラッグ&ドロップしてください。
「Copy Items if needed」にチェックを入れます。
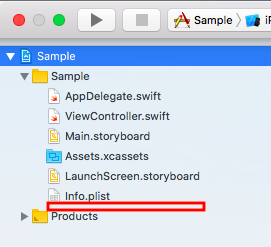
プロジェクトが以下の階層になっていることを確認してください。
sample |
その他、必要なライブラリを選択します。キャプチャに従って以下の順にクリックします。
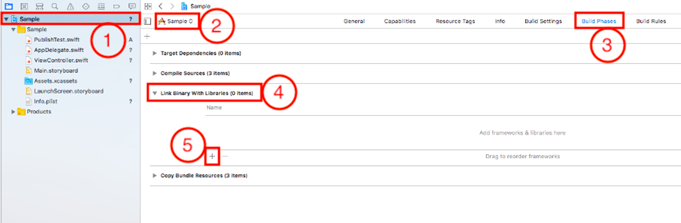
以下のライブラリを追加してください。
● libz.1.2.8.tbd
● libstdc++.6.0.9.tbd
● libiconv.2.4.0.tbd
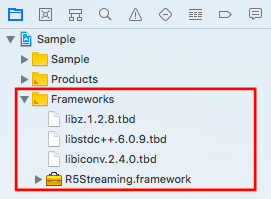
以下のキャプチャのように追加されていることを確認してください。
プロジェクトのディレクトリ構成は以下のようになっています。
Sample
├── Assets.xcassets
├── Base.lproj
│   ├── LaunchScreen.storyboard
│   └── Main.storyboard
├── Bridging-Header.h
├── Info.plist
├── AppDelegate.swift
├── MasterViewController.swift
├── PublishSampleViewController.swift
└── SubscribeSampleViewController.swift
        :
        :
: |
各ファイルの詳細を以下に示します。
章番号 |
ファイル名 |
説明 |
Main.storyboard |
メインのストーリーボード |
|
Bridging-Header.h |
Objective-CとSwiftのコードを1つのプロジェクトで管理するためのヘッダーファイル |
|
Info.plist |
設定ファイル |
|
AppDelegate.swift |
アプリ全体のライフタイムイベントを管理するためにデフォルトで作成されるクラス |
|
MasterViewController.swift |
トップ画面のコントローラ |
|
PublishSampleViewController.swift |
ストリーミング配信機能のコントローラ |
|
SubscribeSampleViewController.swift |
ストリーミング視聴機能のコントローラ |
本セクションではストーリーボードの設定を行います。
「Main.storyboard」を開いて編集します。
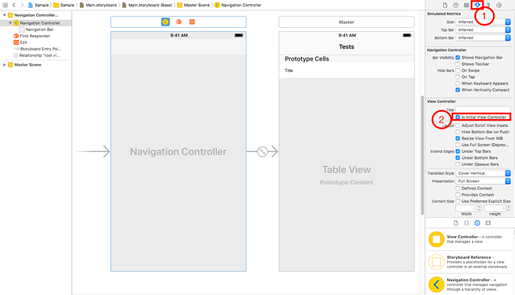
表示されている枠内の「View Controller」を削除します。
以下のキャプチャに従って「①Navigation Controller」を②へドラッグ&ドロップし、ストーリーボードに追加します。
キャプチャに従って以下の順にクリックし、「Navigation Controller」をはじめに読み込むように設定します。(※②)
キャプチャに従って以下の順にクリックして②に「MasterViewController」と入力し、ストーリーボードと実際の項目との関連付けを行います。
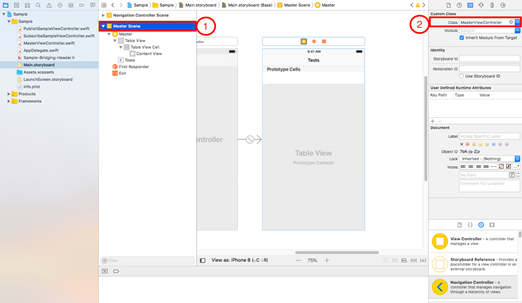
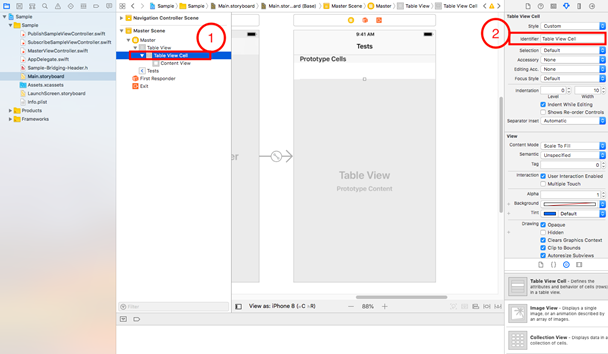
キャプチャに従って①と②を等しい文字列に設定し、Cellを認識させます。
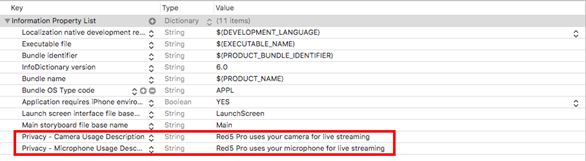
「info.plist」を以下のように編集し、カメラとマイクを利用する実行権限をアプリに付与します。
info.plist
Red5Pro SDKを読み込むためにヘッダーファイル「Sample-Bridging-Header.h」を作成します。
「Sample-Bridging-Header.h」ファイルを次のように編集します。
※Red5Pro SDKはObjective-Cで書かれているため、Swiftを利用したアプリケーションへRed5Pro SDKを読み込むためにヘッダーファイル「 Sample-Bridging-Header.h 」を作成します。
Sample-Bridging-Header.h
10 |
#import <R5Streaming/R5Streaming.h> |
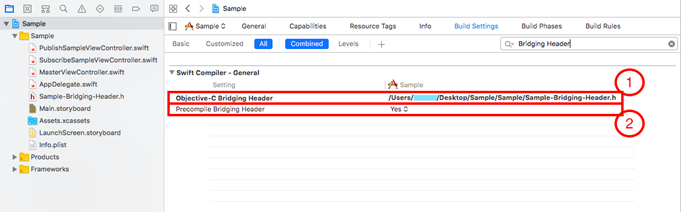
以下のキャプチャに従って、2つの設定を行います。
① 「Objective-C Bridging Header」を次のように編集し、「Sample-Bridging-Header.h」をヘッダーファイルとして読み込みます。
$(SRCROOT)/$(PROJECT)/$(PROJECT)-Bridging-Header.h |
② 「Precompile Bridging Header」をYesに設定して下さい。
このクラスは、トップ画面における機能について実装されています。
「FirstViewController」を次のように編集します。
本セクションではファイル名を「MasterViewController.swift」に変更しています。
MasterViewController.swift
1 |
import UIKit

class MasterViewController: UITableViewController {


    let type = ["Publish(RTSP)", "Subscribe(RTSP)"]

    let config = R5Configuration()
    func setConfig() {
        config.host = "XXX.XXX.XXX.XXX"
        config.port = 8554
        config.contextName = "live"
        config.protocol = 1
        config.buffer_time = 0.5
        config.licenseKey = "XXXX-XXXX-XXXX-XXXX"
        config.streamName = "stream1"
    }

    override func viewDidLoad() {
        super.viewDidLoad()
        setConfig()

        AVCaptureDevice.requestAccess(for: AVMediaType.video) { videoGranted in
            AVCaptureDevice.requestAccess(for: AVMediaType.audio) { audioGranted in
                if !videoGranted, !audioGranted {
                }
            }
        }
    }

    override func tableView(_ tableView: UITableView, numberOfRowsInSection section: Int) -> Int {
        return type.count
    }


    override func tableView(_ tableView: UITableView, cellForRowAt indexPath: IndexPath) -> UITableViewCell {
        let cell = tableView.dequeueReusableCell(withIdentifier: "Cell", for: indexPath as IndexPath)
        cell.textLabel!.text = type[indexPath.row]
        return cell
    }

    override func tableView(_ tableView: UITableView, didSelectRowAt indexPath: IndexPath) {
        let title = type[indexPath.row]

        if title == "Publish(RTSP)" {
            let viewController = PublishSampleViewController(config: config)
            navigationController?.pushViewController(viewController, animated: true)
        } else if title == "Subscribe(RTSP)" {
            let viewController = SubscribeSampleViewController(config: config)
            navigationController?.pushViewController(viewController, animated: true)
        }
    }
} |
「MasterViewController.swift」について補足します。
<L10-16>
このクラスでは、トップ画面の実装が書かれています。
コード中の次の部分で、配信や視聴を行うための設定について記述をしています。
10 |
config.host = "XXX.XXX.XXX.XXX" |
各プロパティの説明は以下の通りです。
設定 |
説明 |
config.host |
接続するサーバーのIPアドレスを指定しています。 |
config.port |
ストリーミングのポート番号を指定しています。 |
config.contextName |
ここではライブ配信であるという設定を行っています。 |
config.protocol |
ストリーミングの送受信に用いるプロトコルの設定をしています。 |
config.buffer_time |
ストリーミングのバッファーの時間を示しています。 |
config.licenseKey |
配布されたSDKライセンスキーを入力しています。 |
config.streamName |
ストリーミングのチャネル名を指定しています。 |
このクラスは、配信画面機能のファイルを設定しています。
「PublishSampleViewController.swift」を作成し、以下のように編集します。
PublishSampleViewController.swift
1 |
import UIKit
import R5Streaming

class PublishSampleViewController: UIViewController, R5StreamDelegate {

    let r5VideoViewController = R5VideoViewController()
    var publishStream: R5Stream?

    let videoBitrate = Int32(750)
    let cameraWidth = Int32(640)
    let cameraHeight = Int32(360)
    let audioBitrate = Int32(32)

    let config: R5Configuration

    init(config: R5Configuration) {
        self.config = config
        super.init(nibName: nil, bundle: nil)
    }

    required init?(coder aDecoder: NSCoder) {
        self.config = R5Configuration()
        super.init(coder: aDecoder)
    }

    override func viewDidLoad() {
        super.viewDidLoad()

        view.backgroundColor = .black

        view.autoresizesSubviews = true
    }

    override func viewDidAppear(_ animated: Bool) {
        super.viewDidAppear(animated)

        AVAudioSession.sharedInstance().requestRecordPermission { gotPerm in }

        let connection = R5Connection(config: config)
        publishStream = R5Stream(connection: connection)
        publishStream?.delegate = self


        let videoDevice = AVCaptureDevice.default(for: AVMediaType.video)
        let camera = R5Camera(device: videoDevice, andBitRate: videoBitrate)
        camera?.width = cameraWidth
        camera?.height = cameraHeight
        camera?.orientation = 90
        publishStream?.attachVideo(camera)

        let audioDevice = AVCaptureDevice.default(for: AVMediaType.audio)
        let microphone = R5Microphone(device: audioDevice)
        microphone?.bitrate = audioBitrate
        microphone?.device = audioDevice
        publishStream?.attachAudio(microphone)

        r5VideoViewController.setFrame(view.frame)

        r5VideoViewController.attach(publishStream)

        publishStream?.publish(self.config.streamName, type: R5RecordTypeLive)

        addChildViewController(r5VideoViewController)
        view.addSubview(r5VideoViewController.view)
        r5VideoViewController.setFrame(self.view.bounds)

        r5VideoViewController.showDebugInfo(true)
    }

    override func viewDidDisappear(_ animated: Bool) {
        super.viewDidDisappear(animated)
        publishStream?.stop()
    }

    func onR5StreamStatus(_ stream: R5Stream!, withStatus statusCode: Int32, withMessage msg: String!) {
        if (Int(statusCode) == Int(r5_status_disconnected.rawValue)) {
            self.removeFromParentViewController()
        }
    }
}
|
「PublishSampleViewController.swift」について補足します。
<L9-12>
以下の値を自分で指定することが出来ます。この4つの値は、型「Int32」が指定されています。
プロパティ |
説明 |
videoBitrate |
ビデオのビットレートを指定することが出来る。 |
cameraWidth |
カメラの横幅を指定することができる。 |
cameraHeight |
カメラの縦幅を指定することができる。 |
audioBitrate |
オーディオのビットレートを指定することができる。 |
<L44-49>
ストリーミングに必要なカメラの設定をしています。
44 |
let videoDevice = AVCaptureDevice.default(for:
AVMediaType.video) |
<L51-55>
ストリーミングに必要なオーディオの設定をしています。
51 |
let audioDevice = AVCaptureDevice.default(for:
AVMediaType.audio) |
<L59>
r5VideoViewControllerをpublishStreamに接続しています。
59 |
r5VideoViewController.attach(publishStream) |
<L61>
このメソッドでは配信を開始しています。
ストリームの名前は、上記で入力した値を使用していることを示しています。
61 |
publishStream?.publish(self.config.streamName, type: R5RecordTypeLive) |
<L67>
通信の状況を示す情報を左上に表示するかを型「Bool」で指定することが出来ます。
67 |
r5VideoViewController.showDebugInfo(true) |
このクラスは、視聴画面の機能を設定しています。
「SubscribeSampleViewController.swift」を作成し、以下のように編集します。
SubscribeSampleViewController.swift
1 |
import UIKit
import R5Streaming

class SubscribeSampleViewController: UIViewController, R5StreamDelegate {

    let r5VideoViewController = R5VideoViewController()
    var subscribeStream: R5Stream?

    private let config: R5Configuration

    init(config: R5Configuration) {
        self.config = config
        super.init(nibName: nil, bundle: nil)
    }

    required init?(coder aDecoder: NSCoder) {
        self.config = R5Configuration()
        super.init(coder: aDecoder)
    }

    override func viewDidLoad() {
        super.viewDidLoad()

        view.backgroundColor = .black
    }

    override func viewDidAppear(_ animated: Bool) {
        super.viewDidAppear(animated)

        let connection = R5Connection(config: config)
        subscribeStream = R5Stream(connection: connection)

        subscribeStream?.delegate = self

        r5VideoViewController.setFrame(view.frame)

        r5VideoViewController.attach(subscribeStream)

        subscribeStream?.play(self.config.streamName)

        addChildViewController(r5VideoViewController)
        view.addSubview(r5VideoViewController.view)
        r5VideoViewController.setFrame(self.view.bounds)

        r5VideoViewController.showDebugInfo(true)
    }

    override func viewDidDisappear(_ animated: Bool) {
        super.viewDidDisappear(animated)
        subscribeStream?.stop()
    }

    open override var shouldAutorotate: Bool {
        return true
    }

    open override var supportedInterfaceOrientations: UIInterfaceOrientationMask {
        return .all
    }

    func onR5StreamStatus(_ stream: R5Stream!, withStatus statusCode: Int32, withMessage msg: String!) {
        if statusCode == r5_status_disconnected.rawValue {
        }
    }
} |
「SubscribeSampleViewController.swift」ファイルについて補足します。
<L39>
このメソッドでは配信を開始しています。
ストリームの名前は、上記で入力した値を使用していることを示しています。
39 |
subscribeStream?.play(self.config.streamName) |
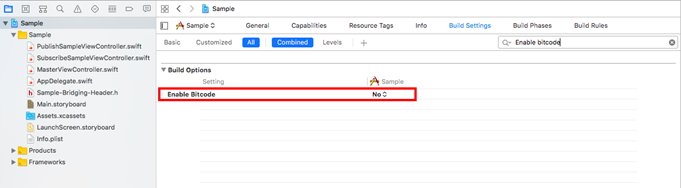
ライブラリ「R5Streaming.framework」はビットコード非対応であるため、以下のキャプチャに従ってEnable bitcodeをNoに設定してください。
作成したアプリケーションを実行します。2台のiOSデバイスを用いて1台目のデバイスから配信する映像を、2台目のデバイスで視聴できることを確認します。
※iOSデバイスで配信し、Androidデバイスで視聴すること、またその逆も可能です。Android端末での配信、視聴の方法は「 Android SDK 」を参照してください。
1台目のデバイスでは配信を行います。
以下のキャプチャにしたがって「publish(RTSP)」をタップします。
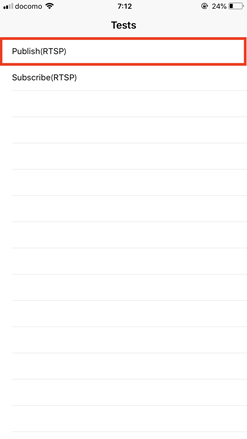
2台目のデバイスでは視聴を行います。
以下のキャプチャにしたがって「subscribe(RTSP)」をタップします。
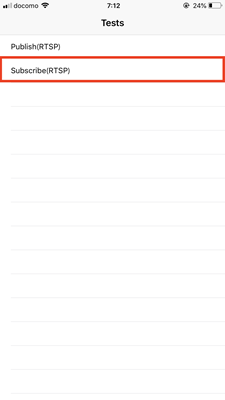
2台目のデバイスにて、1台目のデバイスのカメラの映像が視聴できることを確認してください。
前セクション「 iOSによるQuick Start 」では、iOS-SDKを利用した最もシンプルなアプリケーションの作成方法を解説しました。本セクションでは、Infrared5社がGitHubに公開しているサンプルアプリケーションを紹介します。本サンプルアプリケーションは、プロダクト用途を想定したSDKの利用サンプルを提供しています。
サンプルアプリケーションを取得します。Gitを利用してプロジェクトをクローンします。
作業ディレクトリを「$HOME/」とします。
$ git clone https://github.com/red5pro/streaming-ios.git |
実行後、以下のようにサンプルがクローンできたことを確認して下さい。
$ ls -la | grep "steaming-ios*" drwxr-xr-x@ xx user staff xxx x x 00:00 streaming-ios |
Xcodeを起動して、クローンしたプロジェクト「streaming-ios」を選択し、以下の値を変更します。
設定 |
例 |
|
Identity |
Bundle Identifer |
任意の一意な名前 |
Signing |
Team |
任意のチームアカウント |
Deployment Info |
Deployment Target |
任意のバージョン |
「streaming-ios」を起動します。本アプリケーションは、2台のiOSデバイスを用いて1台目のデバイスから配信する映像を、2台目のデバイスで視聴できることを確認します。
※iOSデバイスで配信し、Androidデバイスで視聴すること、またその逆も可能です。Android端末での配信、視聴の方法は「 Android SDK 」を参照してください。
1台目のデバイスでは配信を行います。以下のキャプチャにしたがって「Home」をタップします。
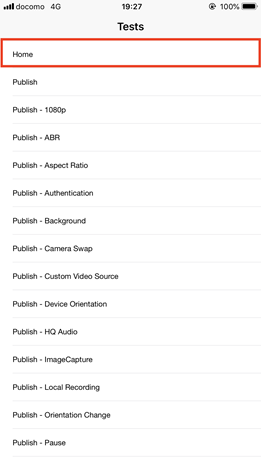
次の画面が表示されたら成功です。
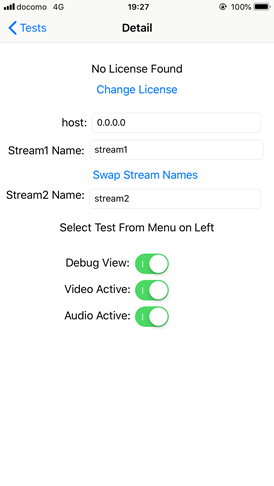
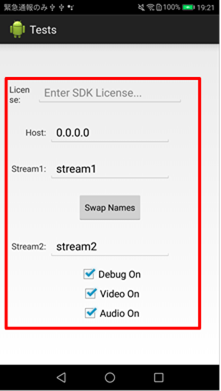
配信のホストやライセンスキーの入力をします。
次の値を設定し、左上の「Tests」をタップして最初の画面に戻ります。
設定 |
初期値 |
設定の例 |
License Key |
“No License Found” |
XXXX-XXX-XXXX-XXXX (Red5Pro SDK License) |
host |
0.0.0.0 |
XXX.XXX.XXX.XXX (接続先のIPアドレス) |
Stream1 Name |
stream1 |
test1 |
Stream2 Name |
stream2 |
test2 |
「Home」の下の「Publish」をタップし、配信画面を起動します。
2台目のデバイスではストリームの視聴を行います。
1台目のデバイスと同様に接続し「4.3.3. 1台目のデバイスの設定 」を実施します。
完了後、2台目のデバイスよりアプリケーションを起動します。
以下のキャプチャに従って「Subscribe」を選択してください。
「4.4.3 1台目のデバイスの設定 」にて起動した1台目のデバイスのカメラの映像が2台目のデバイスで視聴できることを確認してください。
本セクションでは、Androidデバイスによるライブストリームの配信および視聴方法について解説します。なお、本セクションのQuickStart、サンプルアプリケーションは、プロトコル「RTSP」で動作します。
本セクションにおける前提条件を以下とします。
Windowsでの操作を前提としています。
● Windows 10 Home(Pro推奨)
AndroidStudioがインストールされている必要があります。バージョンは以下です。
● AndroidStudio 3.1
※
「 AndroidStudio3.1.x 」またはそれ以降のバージョンは動作保証しておりません。
Android Studio download archives( https://developer.android.com/studio/archiv e )にて所定のバージョンをダウンロードして下さい。
エミュレータでの動作についても保証しておりません。
なお、実機テストには以下の端末を検証しています。
● HUAWEI P9(v7.0)
● Nexus 5X(v8.1.0)
以下の技術知識を前提としています。
● Android
● Java
● Git
本セクションでは、配信機能と視聴機能を備えたシンプルなアプリケーションの作成するQuickStartを行います。トップ画面にて「Publish(RTSP)」または「Subscribe(RTSP)」を選択すると、それぞれライブ配信とその視聴を行うことが出来ます。
Quickstartの完成画面は以下のように表示されます。
<Publish>
<Subscribe>

QuickStartで作成するプロジェクト「sample」は以下のような構成です。[1] [2]
sample
    ├── .gradle
    ├── .idea
    └── app
        ├── build
        ├── libs
        └── src
            ├── androidTest
            └── main
                ├── java
                │     └── jp.co.samuraiz.red5pro.sdk.sample
                │          ├── DetailFragment
                │          ├── ListOfFragment
                │          ├── MainActivity
                │          ├── PublishFragment
                │          └── SubscribeFragment
                │
                ├── jniLibs
                └── res
                     ├── drawable
                     ├── drawable-v24
                     ├── layout
                     │   ├── activity_main.xml
                     │   ├── fragment_publish.xml
                     │   └── fragment_subscribe.xml
                     ├── mipmap-anydpi-v26
                     ├── drawable-hdpi
                     ├── drawable-mdpi
                     ├── drawable-xhdpi
                     ├── drawable-xxhdpi
                     ├── drawable-xxxhdpi
                     ├── values
                     └── AndroidManifest.xml
|
各ファイルの詳細を以下に示します。
.xmlファイルの詳細
章番号 |
ファイル名 |
説明 |
activity_main.xml |
Top画面の大枠のレイアウトです。 |
|
fragment_publish.xml |
ストリーミングの配信時(Publish選択時)に遷移するレイアウトです。 |
|
fragment_subscribe.xml |
ストリーミングの視聴時(Subscribe選択時)に遷移するレイアウトです。 |
|
AndroidManifest.xml |
アプリケーション全体の設定ファイルです。(本セクションでは、画面の回転、パーミッションの設定を行います) |
.javaクラスの詳細
章番号 |
ファイル名 |
説明 |
MainActibity.java |
QuickStartのメインとなるActivityクラスです。 |
|
DetailFragment.java |
ストリーミングに必要なメソッドを定義しているクラスです。 |
|
ListOfFragment.java |
Top画面のリスト表示に関するFragmentクラスです。 |
|
PublishFragment.java |
ストリーミングの配信設定を行うFragmentクラスです。 |
|
SubscribeFragment.java |
ストリーミングの視聴設定を行うFragmentクラスです。 |
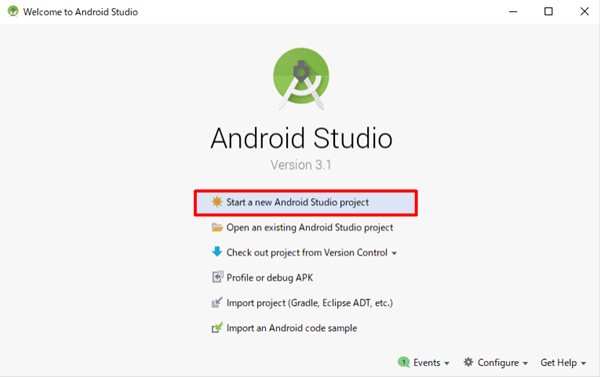
プロジェクトの作成をします。Android Studioを起動し、Top画面が開けたら「 Start a new Android Studio project」をクリックして下さい。
画面「Create Android Project」が開いたら、以下の入力内容に従い設定してください。
設定が完了したら「Next」をクリックしてください。
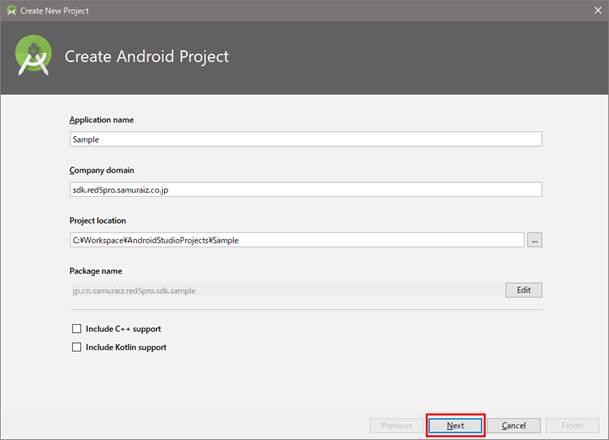
<Create Android Project>
項目 |
設定値 |
Application name |
Sample |
Company domain |
sdk.red5pro.samuraiz.co.jp |
Project location |
C:\Workspace\AndroidStudioProjects\Sample |
「Tablet Android Devices」画面が開いたら、以下の入力内容に従い設定してください。
設定が完了したら「Next」をクリックしてください。
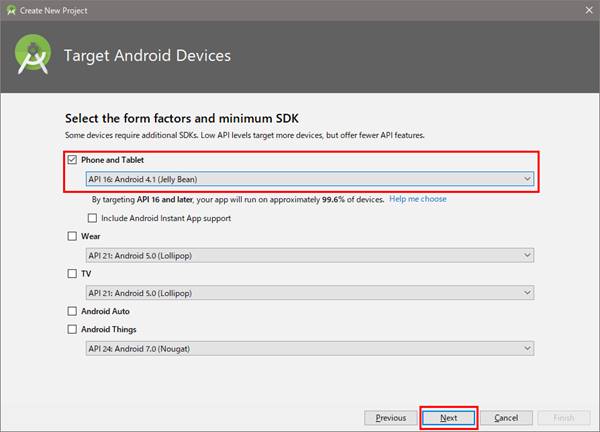
<Target Android Devices>
項目 |
設定値 |
Phone and Tablet |
チェックを入れて 「API 16:Android 4.1(Jelly Bean)」を選択 |
Wear |
※ 利用しません |
TV |
※ 利用しません |
Android Auto |
※ 利用しません |
Android Things |
※ 利用しません |
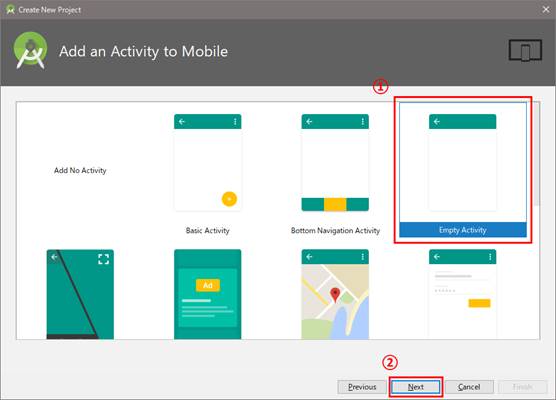
「Add an Activity to Mobile」画面に遷移したら、「Empty Activity」 ※①を選択し、「Next」※② をクリックして下さい。
「Configue Activity」画面に遷移したら、以下の入力内容に従い設定してください。
設定が完了したら「Next」をクリックしてください。
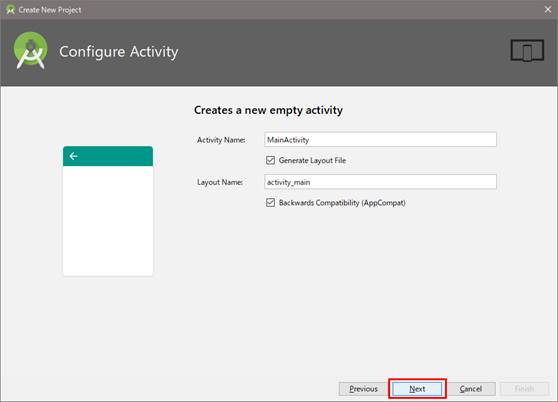
<Configure Activity>
項目 |
設定値 |
Activity Name |
MainActivity |
Layout Name |
activity_main |
※ デフォルト設定で構いません。
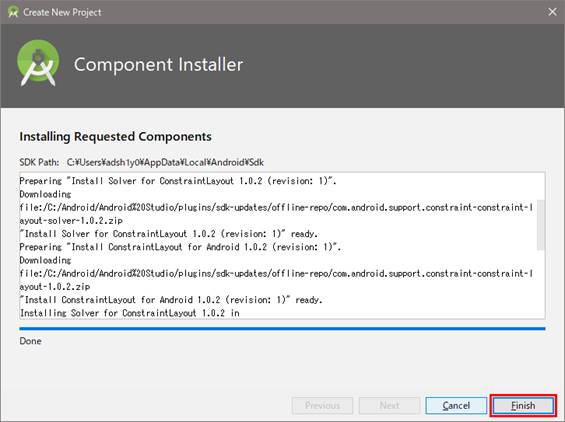
プロジェクト構成の生成が開始されます。完了したら「Finish」をクリックしてください。プロジェクトの作成は、以上となります。
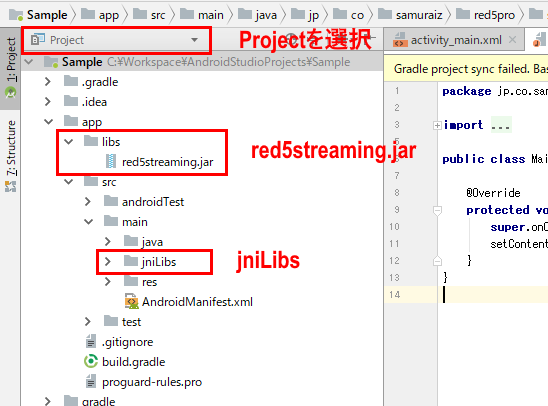
「red5pro-sdk-android-x.x.x-release.zip」を解凍後、「red5pro-streaming-android-sdk-x.x.x-release」ディレクトリ直下に以下のファイルが存在していることを確認してください。
● jniLibs
● red5streaming.jar
「jniLibs」を「src > main」の直下に、「red5streaming.jar」をAndroidプロジェクト用の「libs」に移動して下さい。また、本手順書ではディレクトリ表示は以下のように「Project」を指定して作業を行います。
アプリケーション側のbuild.gradleを開き、以下の赤色下線太字で示した項目を変更します。
左ペインのツリーから「Sample > app > build.gradle」を開いてください。
<build.gradle>(アプリケーション側)
1 |
apply plugin: 'com.android.application'

android {
    compileSdkVersion 27
    defaultConfig {
        applicationId "jp.co.samuraiz.red5pro.sdk.sample"
        minSdkVersion 16
        targetSdkVersion 27
        versionCode 1
        versionName "1.0"
        testInstrumentationRunner "android.support.test.runner.AndroidJUnitRunner"
    }
    buildTypes {
        release {
            minifyEnabled false
            proguardFiles getDefaultProguardFile('proguard-android.txt'), 'proguard-rules.pro'
        }
    }
}

dependencies {
    implementation fileTree(dir: 'libs', include: ['*.jar'])
    implementation 'com.android.support:appcompat-v7:27.1.1'
    implementation 'com.android.support.constraint:constraint-layout:1.1.2'
    testImplementation 'junit:junit:4.12'
    androidTestImplementation 'com.android.support.test:runner:1.0.2'
    androidTestImplementation 'com.android.support.test.espresso:espresso-core:3.0.2'
}
|
修正する項目と修正値については、以下の表をご参照ください。
<build.gradleの変更箇所>
行 |
項目 |
修正値 |
説明 |
4 |
compileSdkVersion |
27 |
compileする API のバージョンを設定します。 |
8 |
targetSdkVersion |
27 |
アプリのターゲットとなるAPIレベルを設定します。 |
25 |
com.android.support:appcompat |
7:27.1.1 |
アプリに含めることができる複数のライブラリのバージョンを設定します。 |
26 |
com.android.support.constraint:constraint-layout |
1.1.2 |
レイアウト「ConstraintLayout」のバージョンです。 |
変更後、下の図の赤枠で示す部分のリンク「Sync Now」をクリックして、ビルドを実行してください。
「AndroidManifest.xml」を開き、以下の赤色下線太字で示すコードを追加して下さい。
左ペインのツリーから「Sample > app > src > main > AndroidManifest.xml」を開いてください。
<AndroidManifest.xml>
1 |
<?xml version="1.0"  encoding="utf-8"?>
  <manifest  xmlns:android="http://schemas.android.com/apk/res/android"
          package="jp.co.samuraiz.red5pro.sdk.sample" >
<uses-permission android:name="android.permission.CAMERA" /> <uses-feature <application |
「AndroidManifest.xml」について補足します。
<L5-11>
パーミッションの追加をしています。以下に詳細を示します。
各パーミッションの詳細
項目 |
説明 |
<uses-permission android:name="android.permission.CAMERA" /> |
カメラの使用権限を取得しています。 |
<uses-permission android:name="android.permission.INTERNET" /> |
インターネットに接続するための権限を取得しています。 |
<uses-permission android:name="android.permission.CAPTURE_AUDIO_OUTPUT" /> |
アプリケーションがオーディオ出力を取得できるようにします。 |
<uses-permission android:name="android.permission.RECORD_AUDIO" /> |
アプリケーションがオーディオを録音する権限を取得します。 |
<uses-permission android:name="android.permission.WRITE_EXTERNAL_STORAGE" /> |
外部ストレージ上のファイルを読み取りまたは書き込みを行うための権限を取得しています。 |
<uses-permission android:name="android.permission.MODIFY_AUDIO_SETTINGS" /> |
音量や転送などの音声全般の設定の変更権限を取得します。 |
<L30>
画面の回転を検知するためにactivityタグに追加する必要があります。また、対応させたいjavaクラスではonConfigurationChangedをオーバーライドします。
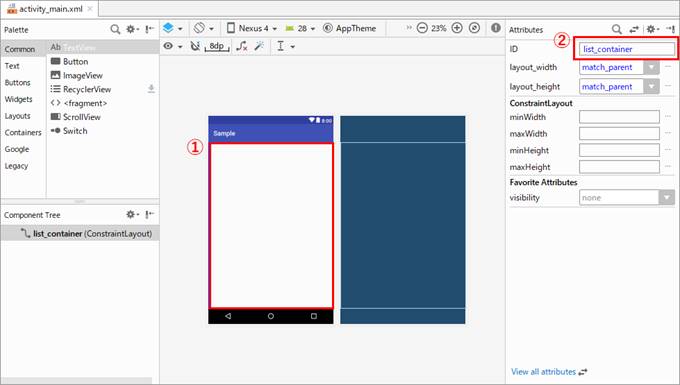
トップ画面のリスト表示のベースとなるレイアウトを作成、編集します。
左ペインのツリーから「Sample > app > src > main > res > layout > activity_main.xml」を開いてください。
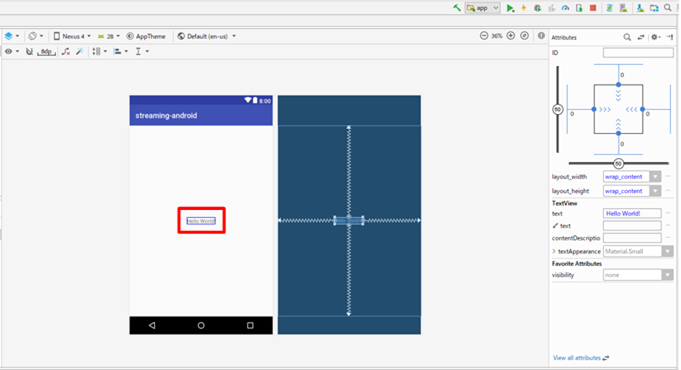
デフォルトでTestViewコンポーネントにて「Hello World!」が定義されていますので、TestViewコンポーネントをクリック→右クリック→「Delete」より削除を行ってください。
次に、以下のようにAndroidの画面をクリックし※①、右ペイン「Attributes」の「ID」のテキスト部に「 list_container」※② を入力し、Androidの画面にIDを設定してください。
<activity_main.xml> (Text)
1 |
<?xml version="1.0" encoding="utf-8"?> |
Top画面のリスト表示の実装を行います。クラス「ListFragment」を利用したクラス「ListOfFragment」を作成します。パッケージ「jp.co.samuraiz.red5pro.sdk.sample」にFragmentクラス「ListOfFragment.java」を以下のように作成して下さい。
<jp.co.samuraiz.red5pro.sdk.sample. ListOfFragment.java>
1 |
package jp.co.samuraiz.red5pro.sdk.sample;
import android.os.Bundle;
import android.widget.ArrayAdapter;
import android.app.ListFragment;
import java.util.ArrayList;
import java.util.List;
public class ListOfFragment extends ListFragment {
@Override
public void onCreate(Bundle savedInstanceState) {
super.onCreate(savedInstanceState);
List |
アクティビティ「jp.co.samuraiz.red5pro.sdk.sample.MainActivity」に前セクションで作成した「ListOfFragment」を組み込みます。以下の 赤色下線太字で示すコードを追加して下さい。
<jp.co.samuraiz.red5pro.sdk.sample.MainActivity.java>
1 |
package jp.co.samuraiz.red5pro.sdk.sample; import android.app.Activity; import android.os.Bundle; public class MainActivity extends Activity { @Override protected void onCreate(Bundle savedInstanceState) { super.onCreate(savedInstanceState); setContentView(R.layout.activity_main); ListOfFragment frag = new ListOfFragment(); getFragmentManager().beginTransaction() .replace(R.id.list_container, frag) .commit(); } } |
Top画面の作成は以上です。続いて、Publish機能の作成に移ります。
ストリーム配信を行う上で必要なFragmentクラスを作成します。クラス「jp.co.samuraiz.red5pro.sdk.sample.DetailFragment」を以下のように作成してください。
<jp.co.samuraiz.red5pro.sdk.sample.DetailFragment.java>
1 |
package com.example.owner.sample;

import android.app.Fragment;

import com.red5pro.streaming.R5StreamProtocol;
import com.red5pro.streaming.config.R5Configuration;


public class DetailFragment extends Fragment {

    public R5Configuration config() {
        String b = getActivity().getPackageName();

        R5Configuration config = new R5Configuration(R5StreamProtocol.RTSP,
                "XXX.XXX.XXX.XXX",
                8554,
                "live",
                0.5F);
        config.setLicenseKey("XXXX-XXXX-XXXX-XXXX");
        config.setBundleID(b);

        return config;
    }

    public String getStreamName(){
        String streamName = "stream1";
        return streamName;
    }

    public boolean videoOn(){
        boolean videoOn = true;
        return videoOn;
    }

    public boolean audioOn(){
        boolean audioOn = true;
        return audioOn;
    }

    public boolean debugView(){
        boolean debugView = true;
        return debugView;
    }

    public Boolean isPublisher () {
        return false;
    }
}
|
クラス「DetailFragment」について補足します。
<L11-23>
Red5Pro Streaming SDKを用いてストリーミングするのに必要な設定をしています。
11 |
public R5Configuration config() {
        String b = getActivity().getPackageName();

        R5Configuration config = new R5Configuration(R5StreamProtocol.RTSP,
                "XXX.XXX.XXX.XXX",
                8554,
                "live",
                0.5F);
        config.setLicenseKey("XXXX-XXXX-XXXX-XXXX");
        config.setBundleID(b);

        return config;
} |
各設定の詳細を以下に示します。
設定 |
説明 |
第一引数 |
ストリーミングの送受信に用いるプロトコルの設定をしています。 |
第二引数 |
接続するサーバーのIPアドレスを指定しています。 |
第三引数 |
ストリーミングのポート番号を指定しています。 |
第四引数 |
ここではライブ配信であるという設定を行っています。 |
第五引数 |
ストリーミングのバッファーの時間を示しています。 |
config.licenseKey |
配布されたSDKライセンスキーを入力しています。 |
<L25-28>
ストリームのチャネル名を指定しています。本セクションでは、「stream1」に設定しています
25 |
public String getStreamName(){
        String streamName = "stream1";
        return streamName;
} |
<L30-33>
映像の設定をしています。本セクションでは有効にするため、「true」としています。
30 |
public boolean videoOn(){ |
<L35-38>
オーディオの設定をしています。本セクションでは有効にするため、「true」としています。
35 |
public boolean audioOn(){
        boolean audioOn = true;
        return audioOn;
} |
<L40-43>
ストリームの配信、視聴の際に通信の状況を示す情報を左上に表示するかをBool値で設定しています。本セクションでは「true」を設定しています。
40 |
public boolean debugView(){
        boolean debugView = true;
        return debugView;
} |
Publishのレイアウトクラスを作成します。「Sample > app > src > main > res > layout」[6] に、設定ファイル「fragment_publish.xml」を作成します。以下の赤色下線太字 で示すコードを追加して下さい。
<fragment_publish.xml>
1 |
<?xml version="1.0" encoding="utf-8"?> |
ストリーム配信時に必要なFragmentクラスを作成します。クラス「jp.co.samuraiz.red5pro.sdk.sample.PublishFragment」を以下のように作成してください。
< jp.co.samuraiz.red5pro.sdk.sample.PublishFragment.java>
1 |
package jp.co.samuraiz.red5pro.sdk.sample;

import android.content.res.Configuration;
import android.hardware.Camera;
import android.os.Bundle;
import android.view.LayoutInflater;
import android.view.View;
import android.view.ViewGroup;

import com.red5pro.streaming.R5Connection;
import com.red5pro.streaming.R5Stream;
import com.red5pro.streaming.config.R5Configuration;
import com.red5pro.streaming.source.R5Camera;
import com.red5pro.streaming.source.R5Microphone;
import com.red5pro.streaming.view.R5VideoView;

public class PublishFragment extends DetailFragment {
    protected R5VideoView preview;
    protected R5Stream publish;
    protected Camera cam;
    protected R5Camera camera;
    protected int camOrientation;

    protected MainActivity publishTestListener;

    @Override
    public void onConfigurationChanged(Configuration config) {
        super.onConfigurationChanged(config);
    }

    @Override
    public View onCreateView(LayoutInflater inflater, ViewGroup container, Bundle savedInstanceState) {

        View rootView = inflater.inflate(R.layout.fragment_publish, container, false);

        preview = (R5VideoView)rootView.findViewById(R.id.videoPreview);

        publish();

        return rootView;
    }
    protected void publish(){
        String b = getActivity().getPackageName();
        R5Configuration config = config();
        config.setBundleID(b);
        R5Connection connection = new R5Connection(config);
        publish = new R5Stream(connection);

        publish.audioController.sampleRate =  44100;

        if(videoOn()) {
            cam = openFrontFacingCameraGingerbread();
            cam.setDisplayOrientation((camOrientation + 180) % 360);

            camera = new R5Camera(cam, 640, 360);
            camera.setBitrate(4500);
            camera.setOrientation(camOrientation);
            camera.setFramerate(15);
            publish.attachCamera(camera);
            cam.startPreview();
        }

        if(audioOn()) {
            R5Microphone mic = new R5Microphone();
            publish.attachMic(mic);
        }

        preview.attachStream(publish);
        preview.showDebugView(debugView());
        publish.publish(getStreamName(), R5Stream.RecordType.Live);
    }

    protected Camera openFrontFacingCameraGingerbread() {
        int cameraCount = 0;
        Camera cam = null;
        Camera.CameraInfo cameraInfo = new Camera.CameraInfo();
        cameraCount = Camera.getNumberOfCameras();
        for (int camIdx = 0; camIdx < cameraCount; camIdx++) {
            Camera.getCameraInfo(camIdx, cameraInfo);
            if (cameraInfo.facing == Camera.CameraInfo.CAMERA_FACING_FRONT) {
                try {
                    cam = Camera.open(camIdx);
                    camOrientation = cameraInfo.orientation;
                    break;
                } catch (RuntimeException e) {
                    e.printStackTrace();
                }
            }
        }
        return cam;
    }

    public void stopPublish(MainActivity listener) {

        publishTestListener = listener;
        if (publish != null) {
            publish.stop();

            if(publish.getVideoSource() != null) {
                Camera c = ((R5Camera) publish.getVideoSource()).getCamera();
                c.stopPreview();
                c.release();
            }
            publish = null;
        }
    }

    @Override
    public Boolean isPublisher () {
        return true;
    }
} |
クラス「PublishFragment」について補足します。
<L43-47>
「 5.2.8. Publish、Subscribeに関するFragmentクラス 」で設定した値をもとに、コネクションを取得します。
43 |
String b = getActivity().getPackageName(); |
<L49>
ストリーミング配信する際のレートの設定を行っています。本セクションでは「44100」としています。
49 |
publish.audioController.sampleRate = 44100; |
<L51-61>
「 5.2.8. Publish、Subscribeに関するFragmentクラス 」で設定したvideoOnメソッドのbool値を元にカメラの設定をしています。
51 |
     if(videoOn()) {
            cam = openFrontFacingCameraGingerbread();
            cam.setDisplayOrientation((camOrientation + 180) % 360);

            camera = new R5Camera(cam, 640, 360);
            camera.setBitrate(4500);
            camera.setOrientation(camOrientation);
            camera.setFramerate(15);
            publish.attachCamera(camera);
            cam.startPreview();
} |
<L63-69>
「 5.2.8. Publish、Subscribeに関するFragmentクラス 」で設定したaudioOnメソッドのbool値を元にマイクの設定をしています。
63 |
if(audioOn()) {
            R5Microphone mic = new R5Microphone();
            publish.attachMic(mic);
} |
リスト選択イベントを組み込むため、クラス「jp.co.samuraiz.red5pro.sdk.sample.ListOfFragment」に、以下の 赤色下線太字で示すコードを追加して下さい。
< jp.co.samuraiz.red5pro.sdk.sample.ListOfFragment.java>
1 |
package jp.co.samuraiz.red5pro.sdk.sample; import android.app.Activity; import android.os.Bundle; import android.view.View; import android.widget.ArrayAdapter; import android.app.ListFragment; import android.widget.ListView; import java.util.ArrayList; import java.util.List; public class ListOfFragment extends ListFragment{ private Callbacks mCallbacks = sDummyCallbacks; public interface Callbacks { public void onItemSelected(String id); } private static Callbacks sDummyCallbacks = new Callbacks() { @Override public void onItemSelected(String id) { } }; @Override public void onCreate(Bundle savedInstanceState) { super.onCreate(savedInstanceState); List |
「MainActivity」に「PublishFragment」を組み込みます。クラス「jp.co.samuraiz.red5pro.sdk.sample.MainActivity」に以下の 赤色下線太字で示すコードを追加して下さい。
<jp.co.samuraiz.red5pro.sdk.sample.MainActivity.java>
1 |
package jp.co.samuraiz.red5pro.sdk.sample; import android.os.Bundle; import android.app.Activity; public class MainActivity extends Activity implements ListOfFragment.Callbacks{ private DetailFragment fragment = null; @Override protected void onCreate(Bundle savedInstanceState) { super.onCreate(savedInstanceState); setContentView(R.layout.activity_main); ListOfFragment frag = new ListOfFragment(); getFragmentManager().beginTransaction() .replace(R.id.list_container, frag) .commit(); } @Override public void onItemSelected(String id) { int _id = Integer.parseInt(id); PublishFragment publish = new PublishFragment(); fragment = _id == 0 ? publish : null; getFragmentManager().beginTransaction() .replace(R.id.list_container, fragment) .addToBackStack(null) .commit(); } @Override protected void onPause() { super.onPause(); onBackPressed(); } @Override public void onBackPressed() { super.onBackPressed(); if (fragment != null && fragment.isPublisher()) { PublishFragment pFragment = (PublishFragment) fragment; pFragment.stopPublish(this); fragment = null; } } } |
Publish機能の作成は以上です。続いてSubscribe機能の作成に移ります。
Subscriberのレイアウトクラスを作成します。「Sample > app > src > main > res > layout」に、設定ファイル「fragment_subscribe.xml」を作成し、以下の 赤色下線太字で示すコードを追加して下さい。
<fragment_subscribe.xml>
1 |
<?xml version="1.0" encoding="utf-8"?> |
ストリーム視聴時に必要なFragmentクラスを作成します。クラス「jp.co.samuraiz.red5pro.sdk.sample.SubscribeFragment」を以下のように作成してください。
<jp.co.samuraiz.red5pro.sdk.sample.SubscribeFragment.java>
1 |
package jp.co.samuraiz.red5pro.sdk.sample;

import android.os.Bundle;
import android.view.LayoutInflater;
import android.view.View;
import android.view.ViewGroup;

import com.red5pro.streaming.R5Connection;
import com.red5pro.streaming.R5Stream;
import com.red5pro.streaming.config.R5Configuration;
import com.red5pro.streaming.media.R5AudioController;
import com.red5pro.streaming.view.R5VideoView;

public class SubscribeFragment extends DetailFragment {

    protected R5VideoView display;
    protected R5Stream subscribe;

    @Override
    public View onCreateView(LayoutInflater inflater, ViewGroup container, Bundle savedInstanceState) {
        View view = inflater.inflate(R.layout.fragment_subscribe, container, false);
        display = (R5VideoView) view.findViewById(R.id.videoView);
        Subscribe();
        return view;
    }

    public void Subscribe(){
        R5Configuration config = config();
        config.setBundleID(getActivity().getPackageName());
        R5Connection connection = new R5Connection(config);
        subscribe = new R5Stream(connection);

        subscribe.audioController = new R5AudioController();
        subscribe.audioController.sampleRate = 44100;
        subscribe.client = this;
        display.attachStream(subscribe);
        display.showDebugView(debugView());
        subscribe.play(getStreamName());
    }

    @Override
    public void onStop() {
        if(subscribe != null) {
            subscribe.stop();
        }
        super.onStop();
    }
} |
<L28-31>
「 5.2.8. Publish、Subscribeに関するFragmentクラス 」で設定した値をもとに、コネクションを取得します。
28 |
R5Configuration config = config(); config.setBundleID(getActivity().getPackageName()); R5Connection connection = new R5Connection(config); subscribe = new R5Stream(connection); |
<L34>
ストリーミング視聴する際のレートの設定を行っています。本セクションでは「44100」としています。
34 |
subscribe.audioController.sampleRate = 44100; |
「MainActivity」に、「SubscribeFragment」を組み込みます。クラス「jp.co.samuraiz.red5pro.sdk.sample.MainActivity」に、以下の 赤色下線太字で示すコードを追加、編集して下さい。
< jp.co.samuraiz.red5pro.sdk.sample.MainActivity.java>
1 |
package jp.co.samuraiz.red5pro.sdk.sample;

import android.os.Bundle;
import android.app.Activity;

public class MainActivity extends Activity implements ListOfFragment.Callbacks{

    private DetailFragment fragment = null;

    @Override
    protected void onCreate(Bundle savedInstanceState) {
        super.onCreate(savedInstanceState);
        setContentView(R.layout.activity_main);

        ListOfFragment frag = new ListOfFragment();
        getFragmentManager().beginTransaction()
                .replace(R.id.list_container, frag)
                .commit();
    }

    @Override
    public void onItemSelected(String id) {
        int _id = Integer.parseInt(id);
        PublishFragment publish = new PublishFragment();
        SubscribeFragment subscribe = new SubscribeFragment();

        fragment = _id == 0 ? publish : subscribe;

        getFragmentManager().beginTransaction()
                .replace(R.id.list_container, fragment)
                .addToBackStack(null)
                .commit();
    }

    @Override
    protected void onPause() {
        super.onPause();
        onBackPressed();
    }

    @Override
    public void onBackPressed() {
        super.onBackPressed();
        if (fragment != null && fragment.isPublisher()) {
            PublishFragment pFragment = (PublishFragment) fragment;
            pFragment.stopPublish(this);
            fragment = null;
        }
    }
}
|
作成したサンプルアプリケーションを実行します。
2台のAndroidデバイスを用いて1台目のデバイスから配信する映像を、2台目のデバイスで視聴できることを確認します。
※iOSデバイスで配信し、Androidデバイスで視聴すること、またその逆も可能です。iOS端末での配信、視聴の方法は「 iOS SDK 」を参照してください。
まず、Android端末をPCに接続して下さい。事前にAndroid端末の設定を行う必要があります。Android端末で、「設定」>「開発者オプション」と選択し、「USBデバック」の項目をONにし、USBデバックを有効にします。
Androidの接続がうまくいかない場合は、手動によるドライバのインストールが必要になります。下記のURLからUSB Driversをインストールしてください。
● USB Drivers
○ https://developer.android.com/studio/run/oem-usb#Drivers
実機の接続、設定が完了したら、現在接続中のAndroid端末より実行して下さい。
プロジェクトを実行したら以下の画面に遷移します。
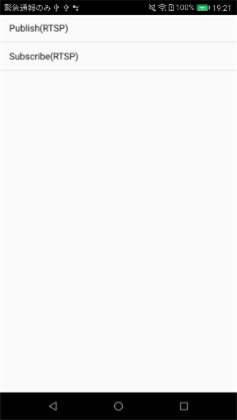
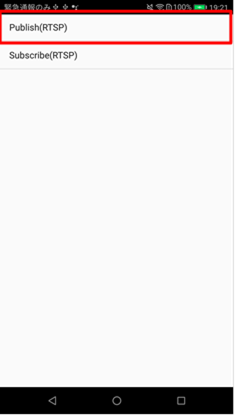
画面が開いたら、「Publisher(RTSP)」をタップして下さい。
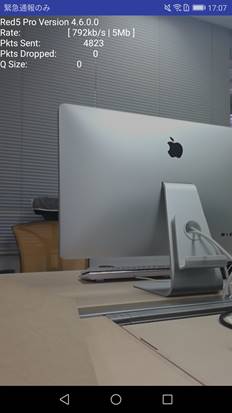
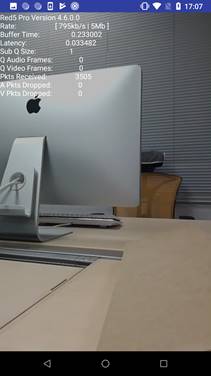
以下の画面のように表示されたら配信側の起動確認が完了です。
※Pubishを行う際、必ずAndroid実機において、作成したアプリケーションに「カメラ」「ストレージ」「マイク」の権限が追加されているか確認して下さい。
別のAndroidデバイスに、作成したアプリケーションを同様にインストールし起動します。
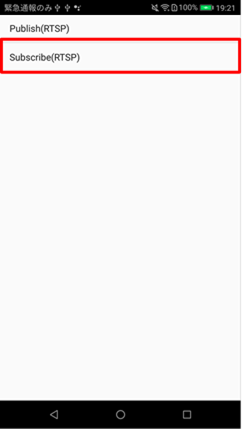
「Subscribe(RTSP)」をクリックします。
2台目のデバイスにて、1台目のデバイスのカメラの映像が視聴できることを確認してください。
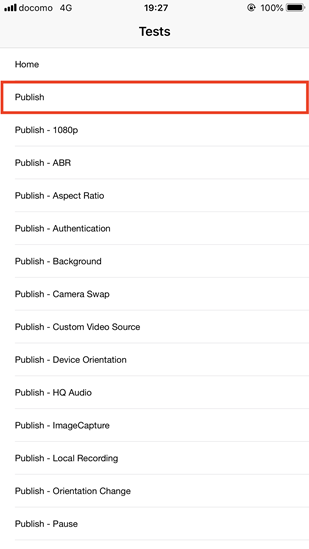
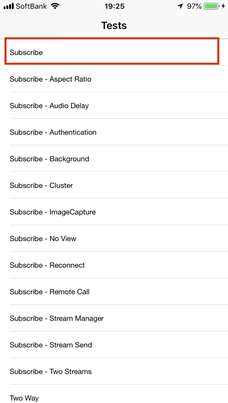
前セクション「5.2. AndroidによるQuick Start 」では、Android-SDKを利用した最もシンプルなアプリケーションの作成方法を解説しました。本セクションでは、Infrared5社がGitHubに公開しているサンプルアプリケーションを紹介します。本サンプルアプリケーションは、プロダクト用途を想定したSDKの利用サンプルを提供しています。
サンプルアプリケーションを取得します。Gitを利用してプロジェクトをクローンします。
作業ディレクトリを「C:\」とします。
コマンドプロンプトを管理者権限で起動し、以下のコマンドを実行してください。
C:\WINDOWS\system32>cd C:\ |
実行後、以下のようにサンプルがクローンできたことを確認して下さい。
C:\>dir | findstr streaming-android |
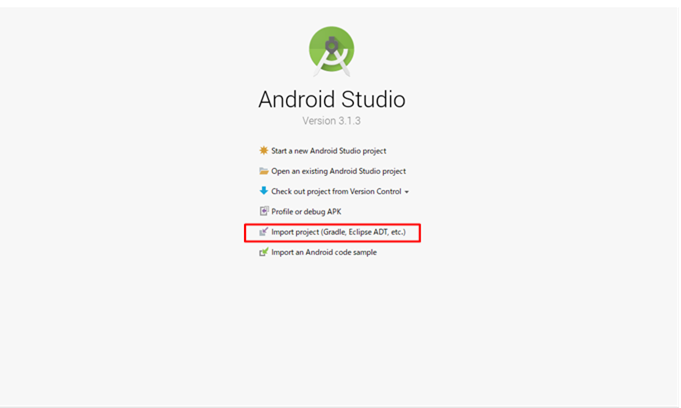
Android Studioを起動して下さい。「Welcome to Andriod Studio」の画面が開けたら、「Import project(Gradle, Eclipse ADT, etc.)」をクリックして下さい。
「Select Eclipse or Gradle Project to Import」ウィンドウが表示されたらクローンしてきた任意のディレクトリ内にある「streaming-android」を選択して、「OK」ボタンをクリックし、プロジェクトをインポートして下さい。
プロジェクトのインポートが完了し、Android Studioのメイン画面が現れたら、プロジェクトのセットアップは完了です。
作成したサンプルアプリケーションを実行します。
2台のAndroidデバイスを用いて1台から配信する映像を、2台目のデバイスで視聴できることを確認します。
※iOSデバイスで配信し、Androidデバイスで視聴すること、またその逆も可能です。iOS端末での配信、視聴の方法は「 iOS SDK 」を参照してください。
実機の接続、設定が完了したら現在接続中のAndroid端末より実行して下さい。
1台目のデバイスでは配信を行います。動作確認を行う1台目のiOSデバイスよりアプリを起動したら、トップ画面の一番上の「Home」をクリックし、License、Host、Stream Nameを設定します。以下のように、それぞれの入力欄に値を入力してください。
設定 |
初期値 |
設定の例 |
License Key |
“No License Found” |
XXXX-XXXX-XXXX-XXXX (Red5Pro SDK License) |
host |
0.0.0.0 |
XXX.XXX.XXX.XXX (接続先のIPアドレス) |
Stream1 Name |
stream1 |
stream1 |
Stream2 Name |
stream2 |
stream2 |

設定が完了したらトップ画面に戻り、「Home」の下にある「Publish」をタップし、配信を開始します。
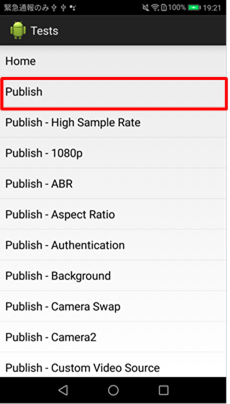
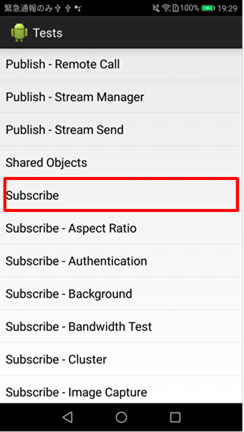
2台目のデバイスではストリームの視聴を行います。
1台目のデバイスと同様に接続し「5.3.3. 1台目のデバイスの設定 」を実施します。
完了後、2台目のデバイスよりアプリケーションを起動します。
以下のキャプチャに従って「Subscribe」を選択してください。
「5.3.3. 1台目のデバイスの設定 」にて起動した1台目のデバイスのカメラの映像が2台目のデバイスで視聴できることを確認してください。